Cert-Manager
Introduction
Cert-manager is a certificate management tool for Kubernetes. It allows you to automate the generation, renewal and management of SSL/TLS certificates for your applications on the cluster. Cert-manager supports multiple certificate providers such as Let's Encrypt, Vault, etc. Using Cert-manager, you can declare the need for a certificate for a specific application via a Kubernetes object, called "Certificate" or "Issuer". Cert-manager is a key component to ensure security and privacy of data in applications on Kubernetes. It makes certificate management easier for cluster administrators, avoiding human error and ensuring the constant availability of valid certificates for applications.In summary, Cert-manager is a powerful tool for managing SSL/TLS certificates in a Kubernetes environment, enabling more efficient and secure certificate management for your applications.
Until now I was using Traefik as Ingress. This one generated the certificates and stored them in a text file located in a longhorn volume (knowing full well that this was not very clean)
Today, it's time for cleanliness... we switch to Cert-Manager!

Install Cert-Manager
At the time of writing this page, we are at version v1.11.0.
kubectl apply -f https://github.com/cert-manager/cert-manager/releases/download/v1.11.0/cert-manager.yaml
Please remember to get the latest version of cert-manager. You can find the available versions here
How Cert-Manager works
The Cert-Manager installation process involves various objects. The ones we are interested in are :
- Issuers
- Certificates
Issuers are certificate providers. Cert-Manager is compatible with the following providers:
- ACME HTTP/DNS (letsencrypt compatible)
- Self-signed (I recommend to generate your own CA)
- Custom CA
- Vault
- Venafi
For the moment, we are only interested in the LetsEncrypt provider (we may see the CA case one day)
Create your own certificates
Add a provider (Issuer)
ACME via HTTP challenge
The most common case when generating a certificate is to use LetsEncrypt with an HTTP challenge. (ex, CertBot)Its configuration is quite fast, here is the manifest to add the ACME of LetsEncrypt.
apiVersion: cert-manager.io/v1
kind: Issuer
metadata:
  name: letsencrypt
spec:
  acme:
    server: https://acme-v02.api.letsencrypt.org/directory
    email: votre_email@ici.tld
    privateKeySecretRef:
      name: letsencrypt
    solvers:
    - selector: {}
      http01:
        ingress:
          class: istio
to remember :
- You must give the ingress used, the challenge needs to be done on port 80 in http.
- the email provided will be used by LetsEncrypt to notify you when the certificate needs to be renewed.
If you fail too many challenges (or generate the same certificate too many times), you will be rate-limited and you will not be able to generate any certificate for fews moments. If you just want to test the procedures, it is possible to use the staging API (so without rate-limits).
The certificates will not be accepted by your browser, but for testing purposes it is ideal.
You just have to replace the url by https://acme-staging-v02.api.letsencrypt.org/directory:
You can check that the Issuer is present via the following command:
➜  kubectl describe issuers.cert-manager.io letsencrypt`.

Status:
  Acme:
    Last Registered Email:  redacted
    Uri:                    https://acme-v02.api.letsencrypt.org/acme/acct/941914187
  Conditions:
    Last Transition Time:  2023-01-31T10:05:12Z
    Message:               The ACME account was registered with the ACME server
    Observed Generation:   1
    Reason:                ACMEAccountRegistered
    Status:                True
    Type:                  Ready
Events:                    <none>
ACME via challenge DNS
First of all: your provider is not always compatible with this method. I use CloudFlare which (thanks to its API) allows me to create entries in my domain to solve the challenge. this method has some advantages like the fact that we do not have to open a port to solve the challenge.
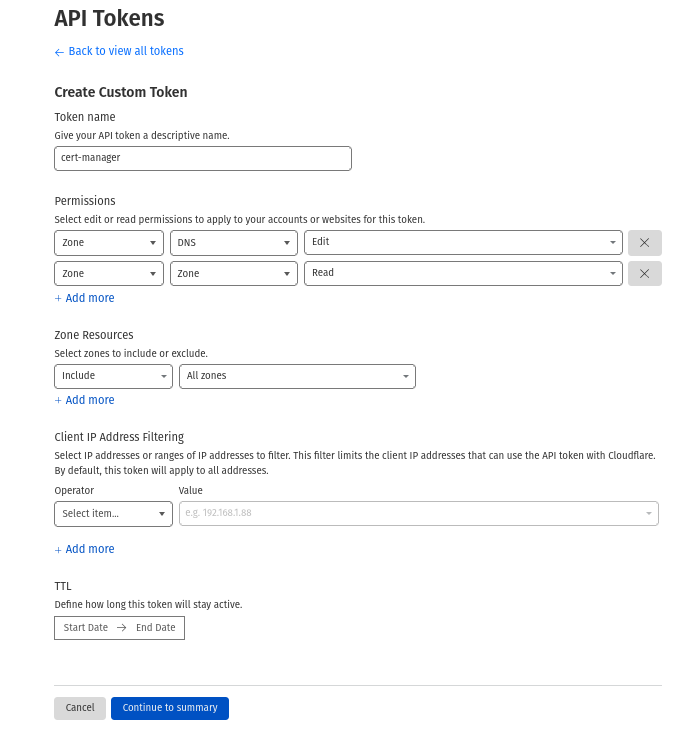
To use the API, we need to create a token to authenticate our request. Go to this page to create your token. The necessary permissions are :
- Zone.Zone READ
- Zone.DNS WRITE
With the token, create this secret:
apiVersion: v1
kind: Secret
metadata:
  name: cloudflare-api-token-secret
type: Opaque
stringData:
  api-token: aaaaaabbbbbbbcccccccdddddd
And add your Cloudflare provider (this one will use our secret)
apiVersion: cert-manager.io/v1
kind: Issuer
metadata:
  name: cloudflare
spec:
  acme:
    email: votre_email@ici.tld
    server: https://acme-v02.api.letsencrypt.org/directory
    privateKeySecretRef:
      name: cloudflare
    solvers:
    - dns01:
        cloudflare:
          apiTokenSecretRef:
            name: cloudflare-api-token-secret
            key: api-token
Create a certificate
Now that the provider is configured, it is now possible to create our certificate. I will generate mine for my domain test.thebidouilleur.xyz.
apiVersion: cert-manager.io/v1
kind: Certificate
metadata:
  name: test-thebidouilleur
spec:
  secretName: test-thebidouilleur-tls
  issuerRef:
    name: letsencrypt
  commonName: test.thebidouilleur.xyz
  dnsNames:
  - test.thebidouilleur.xyz
Check that the certificate is generated and available.
➜  kubectl describe certificate test-thebidouilleur
Events:
  Type    Reason     Age    From                                       Message
  ----    ------     ----   ----                                       -------
  Normal  Issuing    7m9s   cert-manager-certificates-trigger          Issuing certificate as Secret was previously issued by Issuer.cert-manager.io/letsencrypt
  Normal  Reused     7m9s   cert-manager-certificates-key-manager      Reusing private key stored in existing Secret resource "test-thebidouilleur-tls"
  Normal  Requested  7m8s   cert-manager-certificates-request-manager  Created new CertificateRequest resource "test-thebidouilleur-j8x9j"
  Normal  Issuing    5m46s  cert-manager-certificates-issuing          The certificate has been successfully issued
And that the secret is created:
➜  kubectl get secret test-thebidouilleur-tls
NAME                      TYPE                DATA   AGE
test-thebidouilleur-tls   kubernetes.io/tls   2      169m
Using a certificate
Here is a yaml example to generate an Ingress using the secret.
apiVersion: networking.k8s.io/v1
kind: Ingress
metadata:
  name: test-thebidouilleur
  annotations:
    kubernetes.io/ingress.class: "istio"
spec:
  tls:
  - hosts:
    - test.thebidouilleur.xyz
    secretName: test-thebidouilleur-tls
  rules:
  - host: "test.thebidouilleur.xyz"
    http:
      paths:
        - pathType: Prefix
          path: "/"
          backend:
            service:
              name: srvc-thebidouilleur
              port:
                number: 80
Or with an IngressRoute object if (like me) you use Traefik.
apiVersion: traefik.containo.us/v1alpha1
kind: IngressRoute
metadata:
  name: test-thebidouilleur
spec:
  entryPoints:
    - websecure
  routes:
    - match: Host(`test.thebidouilleur.xyz`)
      kind: Rule
      services:
        - name: srvc-thebidouilleur
          port: 80
  tls:
    secretName: test-thebidouilleur-tls